
Archivist Documentation
Documentation
Documentation
Getting Started
Starting a New Campaign
Watch the campaign setup walkthrough below:
Start by navigating to your Campaigns page (you'll see "Explore your Campaigns" at the top of the page). Once there, look for the "plus" icon in the bottom right corner and click it to start the "Add New Campaign" process.
Input campaign details:
- Name
- Description → this is just for you to distinguish between campaigns and not used for any Archivist AI purposes
- System
- Language
Add your Players:
- Player Name should be what they are commonly called (if Gregory Wood goes by Greg, use Greg)
- Character Name should be the full in-game name of the character. You will be able to add aliases later
- Discord Handle - it is recommended to add the Player's discord handle if you will be playing this way. This should be the profile handle, not the name specific to the server
Note: this can be done outside of the setup workflow but it is recommended to complete prior to your first session.
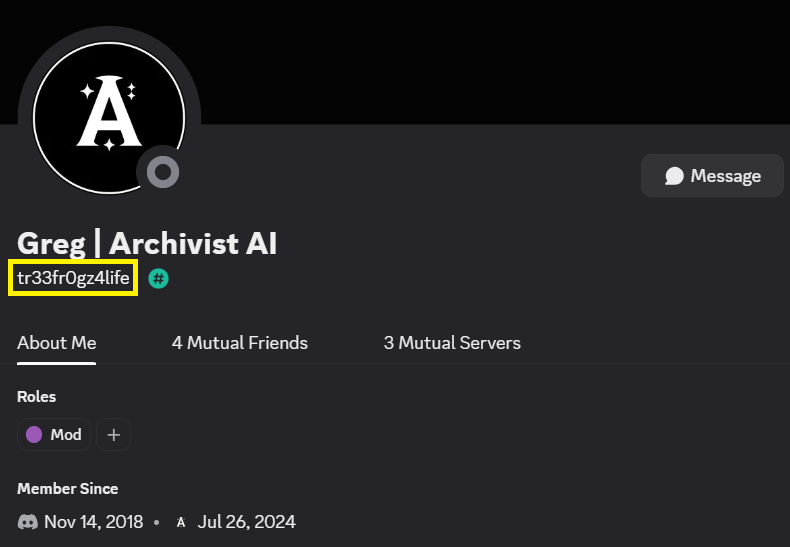
The Discord Handle needed is in the yellow box.
For more detailed information about setting up your campaign participants, see Campaign Cast.
Customize your Tone:
- Recaps, Descriptions, Highlights - Customize the tone/style/format of your content generation
- Campaign Chatbot - Customize the tone of 'Ask Archivist' (your dedicated campaign chatbot)
- Image Generation - Customize image generation prompts for characters, items, locations, and factions
Note: this can also be changed in your profile settings at any time
Adding a Session
Watch quick start guide on session creation below or click here for a longer walkthrough:
Discord Live Record
See Discord Quick Start for detailed setup instructions.
- Ensure your discord is connected (both your Archivist profile is connected to Discord & the Archivist AI bot is added to your server).
- New sessions are AUTOMATICALLY created within Archivist when you run the
/startcommand on discord. Note: Archivist will not populate content until session completion - Upon the conclusion of your session, triggered by the
/endcommand, Archivist will automatically trigger its Session Review and you will receive an email when it is ready
Audio Upload (supported formats)
Upload session recordings as a single mixed file (one recording of the whole table) or as multi-track aligned files (one file per speaker or channel). Single-file uploads use cast voice profiles to map speakers; multi-track uploads skip that step since each file is already tied to one speaker. Watch the walkthrough in Archivist Academy.
- Open your campaign and click the + (Add Session) icon in the top-right corner
- Select the Audio Upload tab
- Choose Single File or Multi-Track, then add your audio (see below)
- Set the Session Date in the order you want on your campaign timeline
- Confirm your Cast for the session
- Submit — Archivist uploads your audio, maps speakers, transcribes, and queues Session Review when ready
Single File (mixed recording)
Best for one recording of the full session: phone at the table, a single Discord export, or any mixed-down track.
- Upload one audio file per session (5 minutes to 6 hours, under 2 GB).
- Select which cast members were present. Archivist uses saved voice profiles when available.
- If someone is missing a voice profile, Archivist can run speaker discovery after upload — you review discovered voices and assign them to cast before transcription continues.
- You can add or refresh voice profiles with manual clips from the recording (optional).
- When ready, choose Start Speaker Discovery or Create Session depending on your cast setup.
Multi-Track (one file per speaker)
Best when you already have separate, time-aligned tracks — for example per-player recordings from Craigbot, a DAW, or virtual tabletop exports.
- Upload one or more aligned track files (same session length, each under 2 GB).
- Assign every track to a cast member before you upload.
- Click Upload and Process Audio. Archivist chunks the tracks and transcribes without a separate speaker-discovery step.
Voice profiles & speaker discovery
- Configure your campaign Cast under Profile → Campaigns → Cast. Voice profiles persist across sessions.
- On single-file uploads, cast without a profile can trigger speaker discovery so new voices are mapped before diarization.
- After discovery, confirm which voice belongs to which cast member (or dismiss unknown voices) before Archivist continues.
- Multi-track uploads skip discovery because each file is already tied to one cast member.
Important Notes:
- • Transcription time scales with audio length; longer sessions take longer to process.
- • Keep the upload drawer open until uploads and any speaker confirmation steps finish.
- • Session Review starts automatically after transcription for your earliest unreviewed session; later sessions wait until prior reviews are complete.
- • You will receive an email when Session Review is ready.
In‑Person Sessions
- Speak in the third person when natural → Speaker diarization is harder without separate voice channels, and this helps attribute dialogue correctly. Consider having the DM provide mini-recaps as scenes change to help with context.
- Use the best microphone available → A podcast mic is ideal, but even a clear phone/laptop recording improves Archivist's output.
- Minimize cross‑talk → Too many people speaking at once reduces transcription quality. Play naturally, but be mindful.
- Trim the audio to exclude the prior session recap → Captures only the current session's content and avoids cross‑contamination.
- Keep audio at normal speed (1x) → Do not speed up files before uploading; 1x ensures the best transcription accuracy.
- Upload with maximum audio quality → Don’t downgrade bitrate to save space; higher quality produces better results.
Supported Audio Formats
Archivist supports the following audio file formats:
.mp3- MP3 Audio.wav- WAV Audio.m4a- M4A Audio.mp2- MP2 Audio.aac- AAC Audio.opus- Opus Audio.webm- WebM Audio
💡 Need to convert your audio file? Use Audacity (free) to convert files to supported formats.
Play by Post via Discord
See Discord Quick Start for detailed setup instructions.
- Ensure your discord is connected (both your Archivist profile is connected to Discord & the Archivist AI bot is added to your server).
- Open your campaign and click the + (Add Session) icon in the top-right corner
- Select "Play-by-Post"
- Paste the first and last message url into their respective windows (right click on the discord message and 'Copy Message Link')
- Click 'Create Session'; note: additional sessions will be created for a high volume of text ingest
- Session Review Triggered automatically
- You will receive an email when the Session Review is ready
Transcript Upload (.txt, .md, .doc, .docx)
- Open your campaign and click the + (Add Session) icon in the top-right corner.
- In the modal, choose the Text Upload tab and set Session Type → Transcript Upload.
- Pick an Upload Method:
- Upload File — click Choose Text File (or drag-and-drop) to select your transcript (
.txt,.md,.doc,.docx). - Google Docs — paste a public share link. Make sure the doc is set to publically so Archivist can access it.
- Upload File — click Choose Text File (or drag-and-drop) to select your transcript (
- Ensure the file follows a transcript-like pattern with each line prefixed by a speaker name.
- Enter the Session Date so Archivist can place the transcript correctly on your campaign timeline.
- Edit the Session Title and adjust the Cast (Participants) list if needed.
- Click Create Session. Archivist will parse the transcript and queue a Session Review.
- You'll receive an email when the Session Review is ready.
Raw Notes Upload
- Open your campaign and click the + (Add Session) icon in the top-right corner.
- In the modal, choose the Text Upload tab and set Session Type → Raw Session Notes.
- Pick an Upload Method:
- Copy and Paste — paste your text into the text area provided.
- Upload File — accepted formats: .txt, .md, .doc, .docx.
- Google Docs — paste a public share link.
- Each session's raw notes should be between 750 – 5,000 tokens (≈500 – 3,500 words).
- Enter the Session Date.
- Click Create Session; Archivist will parse the notes and queue a Session Review.
- You'll receive an email when the Session Review is ready.
Supported Languages
Archivist supports 35+ languages for transcription, AI processing, and content generation. Language settings are configured at the campaign level during setup and can be changed at any time through your campaign settings.
Archivist automatically detects multiple languages in mixed-language sessions for seamless processing.
Language Configuration
- Set during campaign creation: Choose your primary language when setting up a new campaign
- Change anytime: Update language settings in your campaign settings under Profile (avatar in top nav) → Campaigns
- Campaign-wide setting: The selected language applies to all sessions, transcriptions, and AI interactions within that campaign
Complete List of Supported Languages
Column 1
Column 2
Column 3
💡 Tip:
For best results, ensure all participants in your campaign are comfortable with the selected language, as this will improve transcription accuracy and AI understanding of your content.
Working with Output
Session Review - Your chance to review Archivist's output
Soon after you have ended or uploaded your session, your Session Review will be ready for your approval. You will receive an email & see a golden AI symbol besides the new session signifying that it is ready. Click on the title of the session to review.
Note: the title is AI generated but you can change it during Session Review or later on your Session Details Page.
Watch quick start guide on session review below or click here for a longer walkthrough:
Session Review at a Glance
What it is
- Review and edit Archivist output before it becomes part of the campaign record.
- Focus on factual accuracy, story cleanup, and the details that downstream outputs depend on.
- Choose your level of granularity: skim and approve, or dive deep using the left-side review navigation.
Actions
- Edit content inline anywhere in Session Review.
- Verify your Timeline, the structured outline of your session.
- Re-run Summaries after timeline changes.
- Curate your Compendium (Characters, Items, Locations, and Factions).
- Use Archie to help with corrections, discovery, and questions (desktop).
Compendium Entities
- Compendium Entities: Characters, Items, Locations, and Factions surfaced from the story are reviewed together in a single Review Queue, each tagged New or Update. Approve, edit, reject, or merge each entry to move through the queue.
Key Moments and Hero Awards are no longer part of Session Review—you generate and manage them afterward in Session Highlights.
Archie: Retcon and Find & Replace
- Retcon: Correct factual inaccuracies or wording and include both the incorrect and correct information. Use it when a story detail needs to be rewritten across the review.
- Find & Replace: Fix spelling inconsistencies with a preview-first flow. Rules can be saved.
Example (Retcon): “Bronn picked up the sword, not Eldric.”
Example (Find & Replace): replace “Eldraic” with “Eldric”.
Archie: Discover and Chat
- Discover: If an entity is missing, add it with a simple description. Only use Discover for things you expect are in the transcript.
- Chat: Ask questions about campaign content and scope chat to the current session or the full campaign.
Example (Discover): “You forgot the Glimmering Moonbow.”
Tips
- The Timeline feeds Summaries. Timeline edits are incorporated when summaries are rerun, and you can guide emphasis with a prompt add-on.
- Entity changes persist: Modifications made via Merge, Split, or Find & Replace automatically propagate across the entire Session Review.
- Fix it once: Save Find & Replace rules and they will automatically apply to future sessions.
Session Timeline
Review and edit the story beats (Major, Minor, and Steps) that Archivist has identified from your session. These beats form the backbone of your session's narrative structure.
- Edit beat content by clicking on the text to modify titles and descriptions
- Add new beats by placing your cursor at the end of a beat and pressing Enter
- Adjust hierarchy with Tab (down a level) and Shift + Tab (up a level)
- Reorder by cutting/copying and pasting beats, then delete the original if needed
- Delete beats like in a word doc: put your cursor on the beat's line, clear the content, then press Backspace once more to remove the beat. (Some beats are protected to keep the structure intact.)
- Toggle beat visibility to focus on specific types (Major, Minor, Steps)
Session & Campaign Summary
Review and edit (click the pencil icon in the top right corner) or regenerate the summary (click regenerate icon in top right corner) → customize the AI prompt to your liking (ex. Add more flowery language, include each PC by name, etc)
Characters, Items, Locations, & Factions
Compendium entities are reviewed together in a single Review Queue—Characters, Items, Locations, and Factions in one list rather than separate tabs. Each entry is tagged New (a first appearance) or Update (a match Archivist found with an existing entity), and a progress bar tracks how many items are left to review.
Work through the queue one entry at a time. For each item you can:
- Approve: Accept the entry as-is and advance to the next item.
- Edit: Adjust the name, description, or properties before approving.
- Reject: Discard an entry you don't want added to your campaign.
- Merge (New entries): Combine a new entity with an existing campaign or session entity. The surviving entity keeps an updated description.
- Approved something by mistake? Use the inline Undo on the entry to bring it back into the queue.
- Missing an entity? Use Archie Discover from the review toolbar—choose the entity type and give a short description.
- Keyboard shortcuts let you approve, edit, reject, or merge and jump to the next item without leaving the keyboard.
Reclassifying an entry's type or splitting an incorrectly merged entity is done afterward from the campaign Compendium.
Finish
Final overview of the Session Review ensuring you have visited each portion of the review and providing a numerical summary of:
- Timeline and summaries reviewed
- Entities added & updated (merged)
When finished, select 'Complete Review'. After a few seconds all the information will be paginated to your campaign:
- Summaries populated
- Entity cards created or updated
Once the session record is finalized, generate Key Moments and Hero Awards from it in Session Highlights.
Timeline
The Timeline is your campaign's story backbone — a chronological view of your game sessions and the important events that unfold within them.
Overview
The Timeline organizes your campaign into Sessions arranged chronologically, with each session containing Story Beats that capture the important moments, plot points, and narrative elements from your games.
Story Hierarchy
Your campaign's narrative is organized into three levels of granularity:
- Major Beats: The broad, overarching developments and turning points
- Minor Beats: The supporting details and subplots within those larger events
- Steps: The fine-grained actions and dialogue that make up each scene
Basic Navigation
Viewing Sessions
- Session Headers: Each session appears as a labeled divider showing the session title and date
- Expand/Collapse: Click on a session header to show or hide its story beats
- Auto-Scroll: You will be taken to your most recent session upon page load
Sticky Panel
A sidebar panel provides additional context about the currently selected session:
- Campaign Summary: Overall campaign context and themes
- Sessions: List of all sessions in the campaign
- Session Summary: Key highlights and outcomes
- Characters & Entities: Important NPCs, items, locations, and factions that appeared
- Memorable Moments: Standout scenes or player actions
Timeline Editing
How do I edit Timeline content?
Toggle Edit Mode (Edit button on the first beat) to add, modify, or reorganize your story beats.
Adding Story Beats
When in Edit Mode, place your cursor at the end of a beat and press Enter to create a new beat directly below it. Start typing to add your content.
Editing Beat Content
- Click to Edit: Click on any beat's text to edit it inline
- Two Fields: Each beat has a title/label and an optional description
- Auto-Save: All edits are automatically saved and persisted
- Standard Shortcuts: Use system copy/paste plus undo/redo (Cmd/Ctrl + Z, Cmd/Ctrl + Shift + Z)
Adjusting Beat Hierarchy
- Tab: Move a beat down one level (Major → Minor → Step)
- Shift + Tab: Move a beat up one level (Step → Minor → Major)
Beat Type Visibility
Control which types of beats are visible:
- Major Beats: Toggle on/off
- Minor Beats: Toggle on/off
- Steps: Toggle on/off
Note: In Edit Mode, all beat types are automatically visible so you can work with the complete structure.
How do I reorder story beats?
- Reordering is not done with drag-and-drop.
- Use standard cut/copy and paste shortcuts to move text between beats.
- Delete the original beat after you paste if you want to fully move it.
How do I delete story beats?
- Like a word doc: Put your cursor on the line of the beat you want to remove. Delete all the content on that line; one more Backspace removes the beat entirely.
- Protection: The first Major beat in a session and first Minor beat under the first Major cannot be deleted
- Child Reassignment: If you delete a beat with children, those child beats are moved to the previous beat of the same type
How do I save my Timeline changes?
Auto-Save
- Automatic Persistence: All timeline edits are automatically saved
- Instant Updates: Changes appear immediately and are saved in the background
- No Manual Saving: There's no need to manually save your timeline changes
Loading States
- Optimistic Updates: Changes appear immediately while saving in the background
- Loading Indicators: Spinners show when content is being loaded or saved
- Error Handling: You'll be notified if something goes wrong, with options to retry
Common Timeline Issues
- Can't delete a beat: Some beats are protected to maintain timeline structure
- Drag and drop not working: Only Step-level beats can be reordered
- Changes not saving: Check your internet connection and try again
- Panel too narrow: Drag the panel edge to resize it
Quests
Quests is your campaign-level objective tracker. It helps you keep active goals, blockers, and outcomes in one place so your group can quickly see what still matters between sessions.
What Quests Track
- Quest name and type (new vs update)
- Quest giver (character or faction)
- Objectives with per-objective status
- Progress log and next action
- Success and failure conditions
- Related entities (characters, factions, locations, items)
- Session origin markers (first seen / last updated session)
How to Compile Quests from Sessions
- Open Compile Quests from either the Quests section or the Actions Hub.
- Archivist selects the next eligible session (oldest eligible first).
- Review suggested quest changes in the diff drawer (new quests and updates), then clean up duplicates or mismatches before approval.
- Click Approve to save canonical quest updates.
Sessions must be in done status before they can be compiled.
Editing and Organizing Quests
- Use Search, Sort, and Filters (status, category, session) to focus your list.
- Edit quests inline to keep names, objective text, and actions accurate.
- Objective statuses drive overall quest status, so update objectives first when progress changes.
- Use inline editing to update quest details, objectives, progress logs, related entities, and next actions.
Diff Drawer Actions
- Merge New → New: Merge two newly extracted quests into one.
- Merge New → Existing: Merge a new extracted quest into an existing canonical quest when the AI split or named something awkwardly.
- Split New by Objectives: Split one newly extracted quest into multiple quests based on objectives (available while reviewing a session diff).
- Manual merge apply: Save an approved draft-to-canonical merge directly into the campaign's canonical quest log from the drawer when you know two quests belong together.
- Manual merge rollback: Revert the last applied manual merge if the result is not what you wanted.
- Reject changes: Remove a generated quest update from the current diff.
- Reject + keep extracted: Keep extracted source content while removing the merge result (when available).
- Add Quest: Add a quest directly in the drawer before approval when session-review restrictions allow it.
- Approve: Commit the reviewed run to your campaign's canonical quest log.
Manual merge tools are there to help when two extracted quests should really be one quest, or when a new draft clearly belongs to an existing canonical quest already tracked in the campaign.
Quest Status Guide
- Planned: Not started yet.
- In Progress: Active work is happening.
- Blocked: Progress is currently stalled; move here to pause but keep receiving updates.
- Failed: Terminal—no further compile updates.
- Done: Terminal—no further compile updates.
Pro Tip
Who Can Use It
- View: Players, owners, and admins can view Quests when the feature is enabled for the campaign.
- Compile and approve updates: World owners/admins manage quest compilation and final approval.
Compendium
Use the Compendium to manage your campaign's core entities over time: Characters, Items, Locations, and Factions. You can edit anything manually, and some PC-only fields can be AI-assisted when you choose to run them.
What the Compendium Contains
- Characters (Player Characters and NPCs)
- Items
- Locations
- Factions
What You Can Do
- Search and filter entities across your campaign.
- Find connected entities (for example, everything tied to a specific location or faction).
- Edit descriptions and properties to keep your campaign reference accurate.
- Bulk edit entries from the Compendium category pages using List View.
- Clean up duplicates by merging entries when two records represent the same thing.
Tip: Most cleanup happens during Session Review, but you can also manage entries any time from the Compendium.
Viewing Entries on Compendium Category Pages
Card View: Browse and open individual entries from the Characters, Items, Locations, or Factions pages.
List View: Manage multiple entries at once on those same category pages, including multi-select and bulk actions.
You can switch between Card View and List View from the category pages at any time.
How AI Works in the Compendium
Think in terms of data types. Some fields can be AI-generated as a starting point, and you can always edit them. Nothing updates automatically without you running an action.
- Descriptions (Characters, Items, Locations, Factions): Can be AI-generated as a starting point and are always fully editable.
- Properties:
- Player Characters: Properties can be AI-assisted when you trigger a refresh, and you can edit results any time.
- NPCs, Items, Locations, Factions: Properties are maintained by you.
- Player Character Development: AI-assisted only when you run it. Results are reviewable and editable.
- Backstory: Never edited by AI. These only change when you edit them directly.
Common Tasks
Fix misspelled Characters, Items, Locations, or Factions
Tip: For recurring misspellings, set up Find and Replace rules (see Prevent Misspellings).
- Edit the summary and/or the entity card on the relevant Character, Item, Location, or Faction page.
- Summaries can be edited during Session Review or on the Session Details page via the pencil icon in the top right corner.
- Entity cards can be edited during Session Review or by opening the entity and selecting the pencil icon next to its name.
Update an entry
- Go to Characters, Items, Locations, or Factions (under Compendium in the left navigation) in your campaign.
- Open the entity and select Edit to update its description or properties.
Reclassify an entry
Reclassification works during Session Review and from the Compendium category pages, so you can adjust any entry's type whenever you need to.
- Open the three-dot menu on the entity.
- Select Reclassify.
- Choose the new category (Characters, Items, Locations, or Factions).
Bulk edit entries
- Switch to List View in the Compendium category page.
- Select multiple entries and edit their structured fields together.
Advanced Cleanup
Compendium Cleanup Tools
Open Compendium Cleanup from Campaign Management to run both cleanup workflows.
- Name Cleanup: Open from Compendium list view (Characters, Items, Locations, Factions) or from Actions Hub → Campaign Management → Compendium Cleanup.
- Name Cleanup checks: Surfaces exact name/alias collisions and overlapping or substring-style conflicts so you can catch likely duplicates quickly.
- Name Cleanup actions: Merge same-type duplicates, reclassify entries in the wrong category, and rename/edit entries directly from review flows.
- Description Cleanup (single entity): Open from an entity page edit flow, generate a draft, compare prior vs new text, then apply only what you want to keep.
- Bulk Description Cleanup (Actions Hub): Pick one entity type, select up to five entities, and run one batch rewrite using current descriptions plus completed-session timeline context.
- Description Cleanup controls: Customize rewrite goal, length, and format; choose sources (current description, timeline steps, and character background for characters); then add optional custom guidance before generating.
Merge two entries
You can merge duplicates during Session Review or from the Compendium.
- Open the three-dot menu on the entry and select Merge.
- Choose the entity to merge with.
- Confirm the merge—the surviving entity keeps the combined description.
Alternative: Use Ask Archivist to generate a corrected summary, copy it into the entry you want to keep, then delete the duplicate.
Split incorrectly merged entities (Session Review)
During Session Review, select the Split icon in the top right of the page.
Delete a single entry
- Open the three-dot menu on the entity card.
- Select Delete and confirm.
Delete multiple entries
From a Compendium category page (Characters, Items, Locations, or Factions), switch to List View, select multiple entries, then use Bulk Actions to delete.
Warning: Deleted compendium entries cannot be recovered. This permanently removes the entry and its associated data.
Additional Compendium Features
Set a parent location
- Edit the location card.
- Select the parent location from the dropdown.
Control image style
- By default, Archivist uses the entity description as the prompt for image generation.
- For consistent visuals across a campaign, set a custom Image Prompt in campaign settings.
- If you want a specific style (for example: "ink illustration" or "painterly fantasy portrait"), include it in the description or Image Prompt.
Create a Digital Trading Card
Open any entity page that has an image and select Create Digital Trading Card from the action menu. For full instructions, see Digital Trading Cards.
Characters
Characters are split into Player Characters (PCs) and Non-Player Characters (NPCs). PCs include additional systems like Character Development and PC Properties tables.
Player Characters (PCs)
- Backstory: Written and maintained by you.
- Character Development: A view of how the character changes over time. Run manually and review the results.
- Properties:
- Identity table (species, class, origin, pronouns, and more)
- Connections table (allies, enemies, affiliations, family, and more)
Non-Player Characters (NPCs)
- Description: Edit the NPC description at any time.
- Properties: Maintain a single Properties table for the NPC.
Character Arc
Character Arc turns a Player Character's session history into a structured evolution log so you can see growth, relationships, and recurring themes at a glance.
How it works
- Organized into seven high-level themes that group related facets of development.
- Facets are seeded from timeline beats tagged to the character, influenced by Backstory, and informed by prior Arc state.
- Updates run one session at a time so players can review and approve suggested changes without rewriting past content.
Review and control
- Players trigger Character Arc updates for characters they own, then approve, edit, or rewrite each facet before it goes live.
- Approve or reject auto-suggestions, split or merge facets, and reclassify them across themes as needed.
- GMs and admins can trigger Character Arc updates from the Actions Hub whenever they need to keep the story on track.
Nothing is applied automatically; every change stays under player control.
Property Tables
Each entity type exposes a Properties table with optional metadata. These fields power filters, list views, and bulk actions so campaign data stays structured without sacrificing story—Player Characters have dedicated Identity and Connections tables while NPCs, Items, Locations, and Factions each maintain their own General tables.
Player Characters: Identity & Connections
Identity
- Core metadata like class, subclass, origin, pronouns, and languages.
- Choose up to six active Identity fields from a pool of twenty optional values.
Connections
- Relationship mapping to other entities across your Compendium.
- Activate up to six relationship types from twenty available options.
Players manage the values inside these tables, can trigger AI reviews for suggested updates, and inspect a diff before approving any changes. They cannot change which fields are active or edit the schema.
Campaign owners and admins can configure schemas, edit any entity's properties, and trigger bulk refreshes when needed (see Actions Hub).
Non-Player Entities: General Properties
- NPCs, Items, Locations, and Factions each share a type-specific schema.
- Choose up to six fields per entity type from the predefined set.
- All entries of the same type inherit the same configuration, which keeps bulk workflows predictable.
These properties are fully user-managed and optimized for Compendium category list views.
GM & Campaign Admin access
- Configure property schemas for every entity type and roll those changes out campaign-wide.
- Edit properties for any entity, including both Player Characters and non-player records.
- Bulk-refresh PC property tables from the Actions Hub and apply consistent values across your cast.
- Apply bulk changes using Compendium list views whenever you need to update many entries at once.
Individual property values are editable directly above each table on the entity detail page, while the Actions Hub's bulk refresh tools let you reapply or update values across many entries at once.
Session Highlights: Key Moments and Hero Awards
Session Highlights are the memorable pieces you may want to revisit or share after Session Review. They include Key Moments, which capture the biggest party-wide beats, and Hero Awards, which celebrate one memorable contribution, achievement, or theme for each player character.
The newer highlights flow is designed for the 3-7 moments that matter most, rather than a long list of every smaller scene.
How do I edit or add Key Moments?
Editing Key Moments:
- Open Key Moments (under Highlights in the campaign's left navigation) or the Session Details page.
- Locate the moment and click the three-dots menu in the top right to edit or delete.
Automatic vs. Manual Key Moment Updates:
- Auto-generated: When Key Moments are generated from a completed session, participating Characters, Items, Locations, and Factions are tagged automatically.
- From the Campaign or Session Details Page: Participants must be manually added or updated when editing a moment.
Adding New Key Moments:
- Use Ask Archivist to generate a moment's text.
- Paste it into a new moment and tag the associated participants.
Note: Key Moments are generated from the completed session record and are ready to use as soon as they finish. You can also add new moments manually at any time.
Moment images: On a moment card, open the three-dots menu and choose Upload image (or Manage image if one already exists).
Manage image options: Generate image, Replace image, Download image, and Remove image.
Hero Awards
Hero Awards are player-character highlights. Use them when you want to recognize a standout choice, memorable quote, clever solution, brave failure, or recurring theme from the session.
- Generate awards after Session Review so they can use the cleaned-up session record.
- Review and edit each award before sharing it with the table.
- Use Hero Awards in Session Handouts or save them as shareable Artifacts.
How do I customize the tone of my Key Moments?
- You can input a prompt during campaign setup to customize the tone of your moments.
- This can be changed at any time in your campaign settings found in your profile.
Ask Archivist
Ask Archivist questions about your campaign with perfect recall of prior sessions. It references transcripts, summaries, entities, beats, and lore.
What Ask Archivist Knows
- Session transcripts and summaries
- Character, faction, and location details
- Key story beats and plot points
- Campaign world lore
How to Update What It Knows
- Process and approve sessions in Session Review
- Edit AI-generated summaries during review
- Keep entities up to date in your campaign
- Use Find & Replace for systematic corrections
Common Use Cases
- Fact recall: “Remind me of the dragon type we’re hunting.”
- Narrative: “What was the dialogue with the shopkeeper?”
- World building: “Generate items for an artificer shop.”
- Character development: “What relationships does my PC have?”
- Session planning: “What plot threads are unresolved?”
Tip: Clear chat when starting a new topic to avoid stale context.
Tags
What are Tags?
Tags are a powerful feature that allows you to create dynamic links between different entities in your campaign world. They use the familiar [[Entity Name]] syntax to automatically connect characters, items, locations, factions, and moments throughout your content.
When you use tags, the system automatically:
- Resolves the entity name to find the correct target
- Creates persistent links between your content and the target entity
- Provides visual feedback with background color styling based on entity type
- Enables one-click navigation to the linked entity
Supported Entity Types
Tags work with these entity types in your campaign:
- Characters - Link to character profiles and descriptions
- Items - Connect to item details and descriptions
- Locations - Link to location details and descriptions
- Factions - Reference faction information and relationships
- Moments - Link to specific story moments and events
How to Create Tags
Method 1: Direct Typing with Autocomplete
- Start typing
[[in any text field that supports tags - Type the entity name - an autocomplete dropdown will appear
- Select the desired entity from the dropdown
- Complete the tag - the system automatically adds the closing
]]
Example (while editing): [[Gandalf]] appeared at the gates of [[Minas Tirith]] during the [[Battle of Pelennor Fields]].
Example (when saved): Gandalf appeared at the gates of Minas Tirith during the Battle of Pelennor Fields.
Method 2: Create New Tags (While Editing)
Highlight text to open the tagging dialog. From there you can:
- Apply Tag — if a matching entity is found
- Create New Link
- New → Custom — link to any existing entity
- Or create a brand new PC/NPC/Faction/Location/Item via the corresponding menu
Note: Tag creation and management are available while in Edit Mode.
Tag Management (While Editing)
Click any existing tag to manage it:
- Change — repoint the tag to a different compendium entry
- Apply Everywhere — apply this same tag across the entire campaign (or limit to Session Review when inside SR)
- Remove — remove this tag from the current context
- Remove Everywhere — remove this tag across the entire campaign (or limit to Session Review when inside SR)
Caution
- Find/Replace: Don't try to create tags via the Find/Replace interface—it will only add brackets without creating functional tags.
Visual Feedback and Styling
Tags are automatically styled with subtle glow effects based on the entity type:
- Characters - Blue glow
- Items - Gold glow
- Locations - Green glow
- Factions - Purple glow
- Moments - Orange glow
- Summaries - White/Black
This visual coding helps you quickly identify what type of entity each tag references.
Hover Cards
When you click on a tag, a preview card appears showing:
- Entity name, type, and aliases
- Brief description
Data Studio
Video Walkthrough
Watch a quick tour of the Data Studio, including navigation, filtering, and context menu actions.
Overview
The Data Studio is a powerful network visualization tool that transforms your campaign data into interactive relationship maps. It helps you understand how characters, items, locations, factions, moments, and timeline events connect across your story, revealing hidden patterns and relationships that might not be obvious from linear reading.
What is the Data Studio?
The Data Studio creates interactive network graphs where:
- Nodes represent entities (characters, items, locations, factions, moments, timeline events, session summaries)
- Connections show relationships and tags between entities
Think of it as a "relationship map" that shows how everything in your campaign connects to everything else.
What Does It Visualize?
The Data Studio visualizes six types of campaign entities:
Entity Types
- Characters (Blue) - Player characters, NPCs, and other people
- Items (Gold) - Equipment, treasures, and objects
- Locations (Green) - Places, regions, and settings
- Factions (Purple) - Organizations, groups, and alliances
- Moments (Orange) - Significant story events and scenes
- Timeline (Grey) - Steps, Minor beats, and Major beats
- Summaries (White/Black) - Session summaries and campaign notes
Major Controls & Features
Context Menu (Right-click)
Right-click any node or edge to open the Data Studio context menu (the browser menu is suppressed). Use it to:
- Focus: Highlight the selection and related items while dimming everything else.
- Hide: Remove the selection from view and clear focus if it included the hidden item.
- Open: Jump to the entity detail in a new tab or via the parent page's navigation override.
Session Filtering
What it does: Focus your visualization on specific game sessions or time periods.
How to use:
- Select individual sessions from the session list
- Choose "All Sessions" to see the full campaign
- Session filtering affects Moments, Timeline events, and Session Summaries
- Characters, Items, Locations, and Factions are always campaign-wide (not session-specific)
Why it's useful:
- Analyze specific story arcs
- Compare different time periods
- Focus on recent developments
- Isolate particular sessions for detailed analysis
To/From Filtering System
What it does: Controls which entities appear as "sources" (starting points) and "targets" (endpoints) in your network.
How it works:
- Sources: Entities that can "tag" or connect to other entities
- Targets: Entities that can be "tagged" or connected to by other entities
- Each entity type has separate To/From controls
- You can customize a number or select from a preset
Entity-specific behavior:
- Characters: Can filter to "PCs only" or top N characters
- Factions, Locations, Moments: Can limit to top N entities
- Timeline, Summaries: Can be filtered by session
Fixed Layouts vs. Force-Directed Layouts
Fixed Layouts (Snap to Grid)
What it does: Arranges entities in organized, predictable patterns.
Types:
- Targets Layout: Characters, items, locations, factions, and moments arranged in structured rows/columns
- Timeline Layout: Story beats organized in timeline patterns (rows, clock, story arc)
When to use: When you want organized, readable layouts for analysis or presentation.
Force-Directed Layouts
What it does: Uses physics simulation to position entities based on their connections.
How it works: Entities with more connections cluster together, creating natural groupings.
When to use: When you want to discover natural relationship clusters and organic patterns.
Timeline Visualization Modes
Timeline = Rows
- Arranges timeline events in horizontal rows
- Major events at top, minor in middle, steps at bottom
- Shows chronological progression left to right
Timeline = Clock
- Arranges timeline events in a full circle
- Creates a "clock" view of your campaign timeline
- Shows cyclical or repeating patterns
Timeline = Story Arc
- Arranges timeline events in a half-circle
- Combines linear progression with circular organization
- Good for showing story arcs and development
Presets
The Data Studio includes five preset configurations to get you started quickly:
Top Entities
Purpose: Shows the most connected and important entities in your campaign.
What you'll see:
- Most tagged characters (PCs only), items (top 5), locations (top 5), and factions (top 3)
- Timeline events (Steps only)
- Grid layout with wedge view
- First-order connections only
- Node sizes reflect connection importance
Best for: Getting an overview of your campaign's key players and places.
Entity Deep Dive
Purpose: Detailed analysis of relationships between specific entities.
What you'll see:
- All entity types enabled with full limits
- Automatically selects the most tagged entity for focus
- Multiple entities can be selected - this overrides other targets from the sources/targets table
- Grid layout with wedge view
- First-order connections only
- Clean, uncluttered view for relationship analysis
Best for: Understanding how a specific character, faction, or location connects to everything else.
Session Specific
Purpose: Focus on relationships within a single game session.
What you'll see:
- All sessions available for selection
- Force-directed layout (organic positioning)
- All entity types enabled
- Shows session-specific connections and patterns
Best for: Analyzing what happened in a particular session and how entities interacted.
Timeline Deep Dive
Purpose: Explore how timeline events connect to entities and drive the story.
What you'll see:
- Timeline events prominently featured
- Timeline arranged in rows, clock, or story arc
- Shows how story beats connect to characters, items, locations, and factions
- Special timeline background visualization
Best for: Understanding story structure and how events drive character development.
Playground
Purpose: Clean slate for custom exploration and experimentation.
What you'll see:
- All toggles and filters reset to default
- All entity types enabled
- All sources and targets active
- Maximum flexibility for custom analysis
Best for: Experimenting with different combinations and creating custom views.
Advanced Features
Node Display Options
- Size by Tag Volume: Larger nodes have more connections
- Show Tag Counts: Display connection numbers on nodes
- Labels on Hover Only: Clean view with details on demand
- Hide Zero Tags: Remove entities with no connections
Connection Filtering
- First Order Only: Show only direct connections (recommended for clarity)
- Hide Untagged: Remove entities that aren't connected to anything
- Always Show Timeline: Override filters to always include timeline events
Visual Customization
- Center Node Labels: Improve readability of entity names
- Adaptive X Scale: Automatically adjust spacing for better layout
- Timeline Visibility: Control which timeline levels to show (Steps, Minor, Major)
Search & Selection
- Entity Search: Find and select specific entities to always include
- Multi-Entity Selection: Focus on multiple entities simultaneously
- Clear Entities: Remove search overrides and return to default filtering
Tips for Effective Use
Getting Started
- Start with a preset - Choose the preset that best matches your analysis goal
- Adjust session filtering - Focus on relevant time periods for your analysis
- Use the search - Find specific entities you want to highlight
- Experiment with layouts - Try different visualization modes
For Campaign Analysis
- Use Top Entities to identify your most important characters, items, and locations
- Use Entity Deep Dive to understand a specific character's role
- Use Session Specific to analyze individual game sessions
- Use Timeline Deep Dive to understand story structure
For Session Planning
- Filter to recent sessions to see current story threads
- Use Timeline Deep Dive to identify unresolved plot points
- Focus on specific factions, items, or locations to plan upcoming events
For Character Development
- Use Entity Deep Dive on specific characters to see their connections
- Filter to sessions where a character was prominent
- Look for characters with few connections who might need more development
Troubleshooting
The visualization looks cluttered
- Try "First Order Only" to reduce connection complexity
- Use "Hide Zero Tags" to remove unconnected entities
- Switch to "Labels on Hover Only" for a cleaner view
- Reduce the number of entity types shown
I can't find a specific entity
- Use the search function to find and select specific entities
- Check that the entity type is enabled in the To/From filters
- Verify the entity has connections (tags) to other entities
- Try different session filters if the entity is session-specific
The layout looks wrong
- Try different layout modes (Fixed vs. Force-directed)
- Use the "Reset Camera" button to refit the view
- Switch between different timeline visualization modes
- Check that you have the right preset selected
Performance issues
- Reduce the number of entities shown using To/From limits
- Use "First Order Only" to reduce connection complexity
- Filter to fewer sessions if working with large campaigns
- Try different presets that show fewer entities
Best Practices
- Start broad, then narrow: Begin with a preset, then customize for your specific needs
- Use session filtering strategically: Focus on relevant time periods for your analysis
- Combine multiple views: Use different presets and filters to get a complete picture
- Save interesting views: Use the search function to recreate useful configurations
- Share insights: Use the visualization to explain campaign relationships to players
The Data Studio is a powerful tool for understanding your campaign's complexity and discovering hidden connections. Experiment with different settings to find the views that work best for your analysis needs.
Session Handouts
Session Handout Generator
The Session Handout Generator creates a structured, shareable summary of each session in your campaign. Handouts include summaries, key highlights, character moments, quests, cast insights, and more, making them useful for session prep, player reference, or long-term campaign tracking.
Where to Find the Generator
To generate a handout:
- Open any session from your campaign timeline.
- Click into the session details page.
- Click the Generate Handout button in the top-right corner.
- This opens the Handout Generator in a side panel.
What's Included
Each handout can include structured sections based on session data:
- Session Header: Campaign name, session title, and date
- Session Outline: Step-by-step breakdown of events
- Session Summary: AI-generated narrative recap
- Key Moments: Major session beats selected from Session Highlights
- Hero Awards: Player-character achievements or memorable contributions
- Quests: Active objectives, outcomes, and next steps
- Cast Analysis insights: Participation and table-dynamics highlights when available
- Encounters: Combat, social, or exploration sequences
- Character Spotlights: Per-character highlights and bullet points
- Key Entities: Important NPCs, factions, or locations
- Notable Items: Items found, received, or used
- Valuable Information: Key lore, secrets, or plot reveals
- Party Status: Current conditions, resources, or notes
- Next Steps: Leads or suggestions for future sessions
Note: Sections may be omitted if no relevant data exists.
Important Notes:
- • Source Data: Handout content is pulled from your campaign timeline. Edits made to the timeline will be reflected in generated handouts.
- • Save or Share: Download, email, or save finished handouts as Artifacts when you want to reuse them outside the session page.
Selecting Highlights
By default, Archivist can choose highlights automatically. To select your own:
- Open the handout customization panel.
- Select the Key Moments, Hero Awards, quests, and optional sections you want to include.
- Use the layout controls to reorder sections before exporting or sharing.
Using the Generator
First-Time Use
- Click Generate Handout
- Content appears progressively as it's generated
- Switch between:
- Preview tab: shows the formatted output
- Markdown Source tab: shows raw markdown for editing
- Customize controls: choose sections, highlights, theme, and layout before export
Editing Content
- Open the Markdown Source tab
- Click the Edit icon (a warning will appear if edits may impact layout)
- Make changes directly in the markdown content
- Do not rename headers (e.g. ## Session Summary)
- Click Save to apply your edits
Edits that expand content significantly may affect the 2-page PDF layout. Warnings will appear when applicable.
Downloading & Sharing
- Download as Markdown: Saves a .md file for external editing or import elsewhere
- Generate PDF: Exports a styled, two-page handout with all sections included
- Save as an Artifact: Keeps the finished handout available from the campaign Artifacts library
- Send to Players: Sends a formatted HTML version to all players via email
- Includes campaign/session info and full handout content
Theme Options
Handouts can be styled using one of the following themes:
- Parchment (default): Clean, parchment-inspired design
- Nightwire: Dark background with neon accents
- Azurelight: Light background with blue and grey tones
- Verdant: Nature-forward styling for lush or grounded campaigns
- Infernal Ink: High-contrast styling for darker fantasy sessions
Select your preferred theme before downloading the PDF or sending via email.
Best Practices
Before Generating
- Review Session Content: Make sure the session timeline, Key Moments, Hero Awards, and quests are reviewed first
While Editing
- Preserve Structure: Retain the section headers when editing in markdown
- Keep Edits Concise: Long blocks of text may disrupt formatting in the PDF export
Key Section Guidance
- Key Moments: Highlight decisions, turning points, or surprises
- Hero Awards: Focus on unique player choices, achievements, or character themes
- Next Steps: Summarize leads or unresolved threads
Troubleshooting
- "No moments found": Review or manually add Key Moments in Session Highlights
- "No Hero Awards found": Generate or add Hero Awards after Session Review
- Empty Sections: Fields will remain blank if no relevant data is available
- PDF Formatting Issues: Avoid long edits or excessive text in a single section
Need Help?
- Ensure the session has been fully processed
- Review timeline events in Session Review and highlights in Session Highlights
- Try regenerating the handout if content appears incomplete
Artifacts and Sharables
Video Walkthrough
Tour of the Artifacts hub, collections, and sharing options (email, Discord, and more).
What Artifacts Are
Artifacts are the polished outputs you can reuse or share outside the main campaign workspace. They give you one library for finished handouts, highlights, cards, reports, and player-facing collections.
Artifact Types
- Session Handouts: PDF or player-facing recaps for a single session
- Key Moments: Shareable major story beats from a session
- Hero Awards: Player-character recognition cards or highlights
- Digital Trading Cards: Shareable cards for characters, items, locations, and factions
- Quest Logs: Active objective summaries for players
- Cast Analysis: Single-session or multi-session participation reports
- Collections: Custom bundles of artifacts for your players
Sharing Artifacts
Use Artifacts when the work is ready to leave Archivist. Depending on the artifact type, you can download it, email it, share it to Discord or social media, or collect several pieces into one player-facing bundle.
Tip: Finish Session Review first, then generate highlights and handouts from the cleaned-up session record.
Cast Analysis
Video Walkthrough
Quick tour of Cast Analysis covering access, mapping speakers, and interpreting the charts.
Cast Analysis turns your transcripts into a participation report. On a single session, it shows who spoke, how often, how conversation rotated across the table, and how tone shifted over time. Across multiple sessions, it helps you spot recurring spotlight patterns, momentum changes, and cast dynamics that only become visible over an arc instead of one night.
Want the higher-level framing? Read our Cast Analysis blog post for a deeper explanation of what these patterns can tell you.
Where to Find Cast Analysis
Single-session
- Navigate to a Session Details page.
- Open the Session Actions menu.
- Select Cast Analysis.
This opens the Cast Analysis drawer on the right side of the screen. You will have an opportunity to map unmapped speaker labels to real cast members.
Multi-Session Cast Analysis
- Open the Actions Hub from your campaign.
- Choose Cast Analysis, then switch to the Multi-Session tab.
- Select up to 10 finished sessions that already have stored Cast Analysis results.
- Build the summary, then review the campaign-level charts, trends, and AI insights.
Multi-session analysis starts from stored single-session Cast Analysis runs. If a finished session is missing from the picker, run Cast Analysis on that session once first.
What's Included
Cast Analysis provides a high-level, visual overview of participation and tone. Depending on the view, key components include:
- Talk Share Donut Shows each speaker's share of words (inner ring) and sentiment distribution (outer ring) for one session.
- Radar Chart Compares participation metrics such as dominance, question rate, response share, consistency, and variability.
- Speaker Highlights Detailed statistics per speaker, including lines, words, questions, turn lengths, and longest absences.
- Sentiment Analysis Tracks the emotional tone of a session over time, including positive/negative swings and notable quotes.
- Multi-session trend views Compare selected sessions to surface momentum shifts, recurring spotlight patterns, and campaign-level engagement changes.
- Speaker Mapping Aligns transcript labels across sessions so the same person is tracked consistently in campaign-level views.
- AI Insights Narrative summaries explaining major participation patterns, per-speaker observations, and multi-session takeaways.
💡 Info Icons & Tooltips
Throughout Cast Analysis, you'll find numerous info icons (ⓘ) and hover tooltips. These provide detailed explanations of measurement methodologies, calculation methods, and what each metric represents. If you're confused about how any metric is calculated or what it measures, start by clicking these info icons for clarification.
Important Notes
- Ensure your campaign cast list is up to date.
- Cast Analysis uses your campaign's cast members to correctly associate speakers, colors, and roles.
- Multi-session analysis only includes finished sessions that already have stored Cast Analysis data.
- Campaign-level views are strongest when your speaker mapping is consistent from session to session.
- Desktop is recommended for the full Cast Analysis and multi-session experience, including exports.
See the documentation here: Campaign Cast.
Key Sections Explained
Talk Share Donut
A two-ring chart illustrating:
- Inner Ring: Speaker share of all words spoken
- Outer Ring: Positive, neutral, and negative sentiment distribution
Colors are consistent across all charts and tables.
Radar Chart
Shows how each speaker compares across six participation metrics:
- Dominance
- Response Share
- Question Rate
- Average Turn Length
- Engagement Consistency
- Turn Variability
Useful for spotting who drives discovery, who responds most, and who contributes steadily or in bursts.
Speaker Highlights
A per-speaker table covering:
- Lines and words
- Percent of totals
- Questions asked
- Average turn length
- Longest quiet stretch
- Sentiment score
Helps identify pacing, engagement, and spotlight distribution.
Multi-Session Trends
A campaign-level view built from selected sessions can include:
- Speaker trend lines across sessions
- Campaign profile sentiment and engagement patterns
- Cross-session pair dynamics and momentum changes
- Top-speaker comparisons over a longer stretch of play
Use this view when you want patterns, not just a snapshot.
Sentiment Deep Dive
Visualizes tone across the session using adjustable segments. Includes:
- Per-segment sentiment
- Per-speaker sentiment
- Notable positive and negative quotes
AI Insights
A narrative breakdown generated from the session's metrics.
Includes:
- Table-wide themes
- Per-speaker observations
- Patterns in pacing, sentiment, and spotlight balance
Insights are grounded strictly in observable data.
Digital Trading Cards
Digital Trading Cards let you turn any entity in your campaign into a shareable card — characters, items, locations, and factions all work. Cards can be saved to the entity, downloaded as a high-resolution image, or shared directly to social media.
Creating a Card
- Open any character, item, location, or faction page that has an image.
- Select Create Digital Trading Card from the action menu.
- Choose a theme, customize as needed, then save, download, or share.
Watch the full Digital Trading Card tutorial below or open it on YouTube:
Runtime: 8:28. For the feature announcement and overview, see the Digital Trading Cards release notes.
Themes
Five themes are available: Parchment, Azurelight, Nightwire, Verdant, and Infernal Ink. Each is a complete visual system — choose the one that fits the entity and tone.
What's on the Card
- Portrait: The entity's image, framed in the card's portrait area. Pan and zoom to frame it before export. High-resolution, portrait-oriented images work best.
- Name: The entity's name, with basic details on the line below. For characters: Class, Species, Level. For factions: Type. For items: Rarity / Type. For locations: Terrain / Function.
- Description: Drawn from your entity. Edit before exporting.
- Top Crest: The crest shown at the top of the card. Defaults to the Archivist logo. Can be set to your campaign photo (with or without a theme filter), or hidden entirely.
- Corner Highlight and Featured Trait: Decorative accent elements in the Card Accents section. Each has a dropdown of options specific to the entity type.
- Stats: Six stat fields with editable labels and values.
- Type badge: Character, faction, location, or item — shown automatically.
Saving & Sharing
- Save: Stores the card to the entity record. Does not publish the card publicly.
- Download: Exports a high-resolution PNG.
- Share: Copy a link, or post directly to Pinterest, Facebook, or X/Twitter.
Tips
- Keep descriptions short. Around 30 words fits most themes cleanly.
- Portrait quality matters: high-resolution, portrait-oriented images produce the sharpest cards.
- Adjust stat labels to match your system or flavor.
Journals
What Journals Are
Journals are a permission-aware workspace that supports rich text editing for campaign notes that are not derived from sessions.
- Use journals for world lore, session prep, player notes, and homebrew reference.
- Entries are scoped so you control who can read them and whether Ask Archivist can reference them.
- Journals never modify campaign data, and AI does not edit your entries.
Where to Find Journals
- Open your campaign.
- Open Journals from the left navigation.
Create Entries & Folders
- Click New folder to organize entries (folders can be nested).
- Click New journal to start a fresh entry.
- Use the left sidebar to search, sort, or filter by visibility.
Links in journals
- Website links: Select text (optional), click the link icon in the toolbar, and paste a URL. Typed or pasted
http(s)://addresses and email addresses can become links automatically. Pasting Markdown that includes[label](https://…)links converts them to clickable links when the paste is recognized as Markdown. - Wikilinks: When you can edit an entry,
[[Name]]links connect to characters, locations, items, factions, and moments in your campaign (the same in-world links used elsewhere). They are not the same as links to external websites. - New tab: Website links open in a new browser tab by default, which helps avoid navigating away with unsaved changes in the editor.
Upload Documents
- Click Upload document.
- Choose a file, set an optional title, and pick a folder.
- Click Upload. Archivist converts the file into a journal entry.
Supported formats: PDF, TXT, Markdown, DOCX.
- Keep uploads at or below 10MB.
- If upload fails due file size, remove or compress memory-dense content (for example, embedded images) and try again.
Visibility & Permissions
- Private: owner/admin only (default).
- Role-based: invite specific members and grant View, Edit, or Manage access.
- Full party: everyone in the campaign can view the entry.
- Visibility controls both who can read the entry and whether Ask Archivist can reference it.
Ask Archivist & AI Usage
- Ask Archivist uses journals only when visibility allows.
- Private notes never leak to other players.
- AI does not edit journals or overwrite campaign data.
Storage Limits
- Per entry: 50,000 tokens.
- Per campaign: 1,000,000 tokens across all journals.
- Check usage in the Journals info panel.
Session Management
How do I edit the session title?
- On the Session Details page, click the pencil icon in the top right.
- This icon has the tooltip "Edit Session Title and Summary".
How do I change the session date?
- On the Session Details page, click the pencil icon in the top right (same as editing the session title).
- Note: When you change the session date, it will reorder the timeline but campaign summaries, entity descriptions, etc. are not automatically updated.
- You can use Ask Archivist to generate new summaries/descriptions or just wait for the next Session Review which will re-write everything in chronological order.
How do I add or change a Game Session cover image?
- On the Session Details page, click the pencil icon to open Edit Session.
- In Session Cover Image, choose Upload Image (or Replace Image), then save.
- Use Remove if you want to clear the current session cover image.
How do I regenerate a summary?
Summaries can only be regenerated using Archivist's AI features during Session Review.
- Click the 'Regenerate Summary' icon in the top right corner of either the Campaign Summary or Session Summary tab.
- In the drawer that appears, you'll be allowed to give additional prompt guidance as to how you'd like Archivist to rewrite the summary.
How do I edit session participants?
- Session participants are derived from those tagged in a moment within that session.
- To update session participants, edit or add a moment and ensure the correct participants are tagged.
How do I generate a Session Handout?
Open the Session Details page and click Generate Handout in the top right corner. A modal will guide you through previewing and exporting your handout. See the Session Handouts section for full details.
How do I find my session details page?
- Campaign Timeline: Click on session titles in the campaign timeline
- Campaign Overview: Click on session titles in the session list on the campaign page
- Actions Hub (Jump to Session): Open the Actions Hub dropdown and choose the session you want to visit.
- Email Notifications: Click links in email notifications when sessions are ready
- In-App Notifications: Click notification links that direct to session pages
- Direct URLs: Use bookmarked or shared session URLs
How do I delete a session?
- Scroll to the very bottom of the Session Details page.
- Only campaign owners have access to this option.
How do I download my transcript?
- Click the download button near the session title on the Game Session Details page.
How do I find my session?
Sessions are processed in order. Archivist won't begin analyzing your most recent session until all previous sessions have been approved. This sequential review ensures each new session builds correctly on the campaign knowledge base.
Once processed, you can locate a session in several ways:
- Timeline: In your campaign, open Timeline from the left navigation. Sessions are listed in the right sticky panel under "Game Sessions." Click any session name to open its full details.
- Scroll-to icon: In Timeline view, click the scroll-to icon next to a session to jump to its overall position.
- Sticky panel: The right-side sticky panel shows all game sessions in the "Game Sessions" tab, plus other tabs with relevant campaign information. Click any session name to open its full details page.
How do I share my campaign?
For detailed instructions on publishing your campaign publicly, see the Campaign Sharing section.
How do I upload raw session notes?
See Raw Notes Upload in the Adding a Session section.
Prevent Misspellings (Find & Replace)
How do I make global spelling corrections?
You can run Find and Replace in three places, all using the same safe, preview-first flow:
Profile (avatar in top nav) → Campaign Settings → Find and Replace
Full control. Lets you add rule descriptions, limit the run to specific sessions, filter included data types in preview, and manage all existing rules.
Highlighting text while editing campaign content
When you highlight text anywhere in your campaign, a small toolbar appears.
On the right side is Find/Replace (this shares functionality with the Campaign Wiki tools). This is the fastest way to correct a term while editing.
Session Review
In the left navigation drawer, you will see Find and Replace fields.
Changes made here only affect the active Session Review unless you choose to save the rule, in which case it becomes persistent and will run automatically for future uploads.
Creating a Find & Replace
Regardless of where you start:
- Enter the word or phrase you want to replace.
- Enter the correct version.
- Generate a preview to see every match across your campaign or session.
- Use the preview to filter included data types and select only the matches you want to change.
- Select the matches you want applied.
- Confirm and run the replacement as a background task.
- (Optional) Save the rule to make it persistent for future content.
Notes:
- Only the Profile (avatar in top nav) → Campaign Settings flow allows adding rule descriptions and browsing saved rules.
- Session Review replacements affect only that review unless saved as a rule.
- Toolbar replacements affect the entire campaign unless scoped by the preview.
- If you scope a run to specific sessions, only session-bound content is included. Campaign-wide fields such as the campaign summary, character arcs, and general property tables are excluded.
- After you launch a replacement run, Archivist processes it in the background and notifies you in-app and by email when it finishes.
Existing Rules
View and manage your rules in Profile (avatar in top nav) → Campaign → Find and Replace.
- Toggle rules on or off using the Active switch.
- Click Run to apply a rule immediately.
- Active rules run before any summarization, descriptions, entity work, or other AI writing is generated.
- Use with caution. Active rules apply globally to all upcoming content.
How do I prevent future misspelled words?
- Correct C/I/L/F cards when misspelled.
- Correct misspellings in session and campaign summaries.
- Add aliases to C/I/L/F cards when appropriate.
- Pre-seed your campaign with correctly spelled C/I/L/F cards before playing.
- Set up Find and Replace rules to address recurring issues.
Admin & Sharing
Campaign Permissions & Roles
User Roles Overview
When you create a campaign, there are three main types of users with different permission levels:
1. Campaign Owner
- The person who created the campaign
- Has full control over everything in the campaign
- Cannot be removed from the campaign
2. Campaign Admins
- Players promoted by the Campaign Owner to have administrative privileges
- Have the same permissions as the Campaign Owner
- Can be promoted or demoted by the Campaign Owner
3. Regular Players
- Users invited to join the campaign
- Have limited permissions focused on viewing and basic interaction
- Cannot modify campaign settings or structure
What Each Role Can Do
Campaign Owners Can:
- ✅ Invite and remove players
- ✅ Promote players to admin status
- ✅ Edit campaign language settings, tone prompts, and find/replace rules.
- ✅ Permanently delete a campaign from General Settings after confirming intent.
Campaign Owners & Admins Can:
- ✅ Create and manage game sessions
- ✅ Edit campaign configuration including name, description, system, language, publishing, and campaign tools.
- ✅ Archive and unarchive campaigns from General Settings.
- ✅ Create, edit, and delete characters, items, locations, factions, and moments
- ✅ Upload and generate AI images for all content
- ✅ Access the Ask Archivist feature for the campaign.
- ✅ Edit and reorder the campaign timeline
Standard Players Can:
- ✅ View all campaign content (timeline, characters, items, locations, factions, moments, etc.)
- ✅ Access the Ask Archivist feature for the campaign.
- ❌ Cannot create or edit content
- ❌ Cannot create game sessions
- ❌ Cannot access Session Reviews
Special Character Permissions
There's one exception to the standard player limitations: The Characters They Play.
Players Whose Cast Profile Is Assigned to a Character Can:
- ✅ Edit their character's name, description and aliases
- ✅ Upload or generate AI images for their character
- ✅ Remove their character's image
This allows players to have control over their own characters while maintaining overall campaign security.
Important Notes
- You cannot remove yourself from a campaign if you're the owner
- Admin status can only be changed by Campaign Owners, not by other admins
- Character Cast assignments are managed separately from admin status
- Archived campaigns have a 30-day cooldown before they can be reactivated, and unarchiving also requires an open campaign slot on your current plan.
- Permanent campaign deletion is owner-only and always requires explicit confirmation.
Journals Visibility & Sharing
Journals have their own sharing controls in addition to campaign roles.
- Private entries are owner/admin-only by default.
- Share with the full party or grant per-user access (View, Edit, Manage).
- Visibility also controls whether Ask Archivist can reference an entry.
See the Journals section for step-by-step instructions.
When to Use Different Permission Levels
Small Group with Trusted Friends
Recommendation: Promote all regular players to admin so everyone can contribute equally.
- Everyone can add sessions, edit content, and manage the campaign
- Great for collaborative storytelling where everyone shares GM duties
- Reduces bottlenecks when the main GM isn't available
Large Campaign with Many Players
Recommendation: Keep most players as regular members, only promote a few trusted co-organizers to admin.
- Maintains narrative control while allowing trusted helpers
- Prevents accidental changes to important campaign elements
- Good for organized play or public campaigns
Player-Driven Character Management
Recommendation: Don't promote players to admin, but assign their Cast profile to their characters so they can manage their own character details.
- Players feel ownership over their characters
- Reduces GM workload for character updates
- Campaign structure remains under GM control
Multi-GM Campaigns
Recommendation: Promote rotating GMs to admin status during their story arcs.
- Each GM has full control during their turn
- Campaign owner can adjust permissions as needed
- Maintains campaign continuity across different GMs
Permission Management Tips
- Start Conservative: Begin with fewer admins and promote as needed
- Cast Member Assignments First: Try assigning the player's Cast profile to their characters before promoting to full admin
- Communicate Changes: Let players know when their permissions change and why
- Regular Review: Periodically review who has admin access, especially in long-running campaigns
- Emergency Access: Always have at least one backup admin in case the owner is unavailable
Campaign Cast: Assigning Session Participants
To ensure accurate speaker attribution and improve the quality of your session transcripts, we recommend assigning all participants to your campaign's Cast.
What is the Cast?
- A list of everyone involved in a session, including their name, role(s), and associated characters
- Participants do not need an Archivist account to be listed, though users with accounts benefit from faster setup
Available Roles
- GM (Game Master)
- PC (Player Character)
- NPC (Non-Player Character)
- Other (e.g. surprise guest)
- A participant can have multiple roles in a single session
When to Update the Cast
- At the start of your campaign — either during the campaign setup workflow or anytime afterward in your settings under Profile (avatar in top nav) → Campaigns → Cast
- (If needed) before each session — if roles or participants change (e.g., rotating GMs, absences, guest appearances)
How to Manage It
- Navigate to Profile (avatar in top nav) → Campaigns → Cast
- Add a participant by name, assign one or more roles, and link any relevant characters
- If using Discord, be sure to enter their global Discord handle correctly (See Example)
If someone is marked as the GM, their role will appear greyed out. (This is a known display bug—feel free to ignore; it does not affect functionality.)
Actions Hub
The Actions Hub gives owners and admins a single place to navigate sessions and run high-frequency workflows without jumping between tabs.
- Open the green Actions Hub button from the Campaign header or Game Session page to surface quick navigation and bulk tools.
- Jump to Session lets you switch to any session details view, so you can follow a thread or revisit an important moment in seconds.
- Run Compile Quests from Actions Hub to open Quests with the selected eligible session queued for compile.
- Launch session handouts, single-session or multi-session Cast Analysis, Data Studio, Character Arc updates, property table refreshes, and other campaign-wide utilities directly from the hub.
- Badges and status text highlight pending reviews and flip to an “all caught up” state with prep tips once everything is processed.
Use the Actions Hub to keep control centralized—navigate sessions, trigger analytics, and refresh structured data without hunting through menus.
Account Management
- Manage Subscription: change tiers, update payment, cancel
- Buy More Adventure: add a Campaign Pass or Extra Sessions
- Usage Overview: live counts; view details for breakdowns
- Upgrades/Downgrades: upgrades apply immediately; downgrades next cycle
- Pause/Cancel: cancel stops renewal; account becomes read‑only after period ends
- Delete Account: schedules permanent deletion after a grace period
Gift Subscription
How to Purchase a Gift Subscription
- Go to our Gift Page and choose a 3-month plan: Casual, Seasoned, or Pro.
- Click Buy Gift and enter the recipient's details and a message.
- Select delivery method (immediate email or scheduled).
What delivery options are available?
- Digital delivery (email): Gift code sent directly to recipient's email address
- Printable PDF: Download a gift certificate to print and hand-deliver
- Scheduled delivery: Set a specific date and time for automatic email delivery
- Immediate delivery: Send the gift right away after purchase
How do I redeem a gift subscription?
- Visit app.myarchivist.ai/redeem
- Enter the gift code provided in your email or gift certificate
- Create a new account or sign in to your existing account
- The gift subscription will be automatically applied to your account
What happens if the recipient already has a subscription?
- The gift subscription months are added to their existing plan
- No interruption to their current service
- They'll receive additional months of access beyond their current subscription
- All existing campaigns and data remain intact
Publishing
Publishing Your Campaign
Publishing your campaign makes it viewable to anyone with a shareable link—no login required. This is ideal for sharing your story with friends, showcasing your worldbuilding, or creating a public record of your campaign's progression.
Public campaigns are:
- Directly accessible via a unique URL
- Viewable without an Archivist account
- Read-only—visitors cannot edit your content
- Fully responsive on desktop and mobile devices
How to Publish
You can enable publishing from several locations:
Option 1: From Campaign Settings
- Navigate to your Profile
- Open Campaign Settings in the sidebar
- Select the campaign you want to publish
- In the General Settings, toggle Publish
- Review the Content Policy
- Confirm by checking the agreement box
- (Optional) Mark content as mature (18+ audiences)
- Click Publish
Option 2: From the Campaign Header (Desktop Only)
- Navigate to your campaign
- Toggle the Publish switch in the header bar
- Complete the content policy confirmation
What Gets Shared
When a campaign is published, the following content becomes public:
Campaign Overview
- Campaign title
- Summary/description
- Campaign image (if set)
Session Content
- Session titles and dates
- AI-generated session summaries
World Elements
- Characters, items, locations, and factions (names, descriptions, and images)
- Moments (Session highlights)
Timeline
- Story beats (major, minor, Steps)
What Remains Private
Even when published, the following will not be shared:
- Raw transcripts or audio recordings
- Private GM notes
- Player account information
- Chat history or direct messages
- Uploaded documents or custom lore files
Managing a Published Campaign
Unpublishing
- Toggle Publish off at any time to make your campaign private
- The public link will immediately stop working
Updating Content
- Any changes you make to public content are reflected instantly
- New content is automatically checked for policy compliance before appearing publicly
Accessing and Sharing the Link
- Click the external link icon (↗) next to the publish toggle to preview your public campaign
- Share the URL directly via email, social media, or websites
Content Policy
Before publishing, you must agree to Archivist's Content Policy. You'll be prompted to review and confirm during the publish flow.
Content is automatically moderated. All visible text and images will be checked for violations. If content is flagged, publishing will be blocked.
Moderation applies to:
- All public text (summaries, descriptions, names)
- Character, faction, and location content
- Session and moment summaries
- Campaign and session titles
- Uploaded images
Best Practices
Before Publishing
- Review your content: Confirm descriptions, summaries, and names are accurate
- Check your images: Make sure uploaded art is appropriate and properly cropped
- Preview your campaign: Use the link to verify how everything appears publicly
- Consider your audience: Mark mature content appropriately
After Publishing
- Monitor and update: Keep your campaign content fresh and accurate
- Engage thoughtfully: Add context or details that help public viewers follow the story
- Maintain quality: Publish only what you'd want others to see
Troubleshooting
Publishing Issues
- Flagged content: Try simplifying or rewording descriptions; flagged content won't specify what failed
- Toggle not working: Refresh the page and try again
- Permission errors: Ensure you're the campaign owner
Link & Access Issues
- Broken links: Make sure the campaign is still published
- Unpublished by mistake: Re-enable publishing to restore the link
- Slow loads: Try opening in a different browser or clear your cache
Content Not Updating
- Delay in updates: Wait a few moments for changes to appear
- Moderation hold: New content may be pending moderation before display
- Cached version: Refresh or try a private browsing window
Public GM Profiles
Create a public profile page to showcase all of your campaigns and game listings in one place. Perfect for casual world builders and professional GMs alike, whether your games are hosted on Archivist or run elsewhere.
Who It's For
A one-stop shop to showcase campaigns and listings—ideal for casual world owners and pro GMs alike. Share everything you run, whether it's hosted on Archivist or a prep tabletop experience elsewhere.
What You Get
Your public profile is hosted at:
myarchivist.ai/gm/[your-custom-slug]
You can customize your page with:
- Display name and tagline
- Biography to introduce yourself
- Avatar and Banner/Social Preview image
- Social links (Discord, Instagram, etc.)
- Featured campaigns from your published Archivist campaigns
- Testimonials from players
- Game listings for open seats (if you're a pro GM)
What's Needed
Publishing is available for subscribers only, but your slug stays reserved if your subscription lapses.
Required fields to go live:
- Custom URL slug
- Display name
- Tagline
- Biography
- Avatar
Optional fields you can add later:
- Social links
- Banner/Social Preview image
- Featured campaigns
- Testimonials
- Game listings
Controls & Visibility
- Toggle live anytime: Turn your page live whenever you like and take it down at any time—you control every piece of content
- Nothing is public unless you publish it: Your profile remains private until you explicitly enable it
- Manage game listings: Add or refresh your game listings (Archivist campaigns or outside worlds) to keep open seat info front and center for players
- Update anytime: Edit your profile, add new campaigns, or update listings whenever you want
Getting Started
- Navigate to your Profile
- Open the Public Profile tab
- Claim your custom URL slug (right now!)
- Fill in the required fields (display name, tagline, bio, avatar)
- Add optional content (social links, banner, featured campaigns, testimonials, game listings)
- Toggle the page live when you're ready
Your slug is reserved once claimed, even if your subscription lapses, so secure your preferred URL early.
Campaign Data Export
How do I export campaign data?
- Open your campaign and go to Campaign Settings.
- Click Export Campaign Data.
- Choose scope (campaign-wide or selected sessions), format (Obsidian Vault, Markdown Files, or HTML), and content groups.
- Optional: convert
[[wiki links]]to plain text for Markdown and HTML exports. - Click Start Export to download the ZIP package.
Session-scoped exports include sessions that have completed review.
Discord
Quick Start
- Connect: Profile (avatar in top nav) → Discord → Connect Discord → pick server → Authorize.
- Start a session: In a text channel, run /start, choose your campaign, click Start Session!
- End: Run /end. We'll queue Session Review and email you when ready.
- Ask: Mention @archivist in any configured channel to query prior/completed sessions, or use /asklive during an active session.
Watch a quick demo:
Connect Discord
- Open your Profile → Discord Bot (in the left navigation) → Connect Discord.
- In the OAuth screen, choose your server → Continue → Authorize.
- Back in Archivist, configure which text channels are enabled for features like Ask Archivist.
Note: You can connect multiple servers via the server dropdown.
See the Quick Start section above for a video demo of the Discord integration setup.
Discord G.E.M.S.
G.E.M.S. stands for Game Excerpts, Mentions, and Spotlights. It posts session highlights to Discord shortly after a Discord voice session ends.
What gets posted:
- Session Share Sheet with high-level recap bullets.
- Player Spotlight cards for standout character moments.
- Memorable Quote cards for table lines worth keeping.
Setup checklist
- Connect Discord first (see Connect Discord).
- In Campaign Settings → General, enable Discord G.E.M.S. for the campaign.
- In Profile (avatar in top nav) → Discord Bot, choose a campaign in the channel's Discord G.E.M.S. Campaign dropdown.
- Run a Discord voice session with /start, then finish with /end.
Limits and behavior
- G.E.M.S. publishing currently supports English-language campaigns.
- If G.E.M.S. is disabled for a campaign, that campaign is removed from channel G.E.M.S. assignments.
- Changing a campaign language away from English will disable G.E.M.S. for that campaign.
Bot Permissions & Scope
Admin access required once to add the bot. After setup, admin isn't needed.
What the bot does (and doesn't):
- Only activates in channels you configure.
- No listening to text or voice unless you explicitly use commands (e.g.,
/start), mention@archivist, or use/asklivefor questions. - No access to private channels unless you invite the bot there.
Designed to stay within your designated campaign spaces and only when requested.
Don't have admin access? Ask a server owner to grant it temporarily, add the bot, then remove it.
Voice Sessions
- Start
- Join a voice channel.
- In a text channel, run /start.
- Pick your Campaign, click Start Session!
- The bot joins voice, creates a Session in Archivist, and transcribes in real time.
- Pause / Resume
- /pause: stops transcription and disconnects the bot without ending the session.
- /resume: continues same session (no new session created).
- End
- Run /end in a text channel.
- Bot disconnects and finalizes the transcript.
- Archivist queues Session Review; you'll get an email when ready.
Note: The bot holds one voice connection per Discord server, so it can run only one live session at a time in a given server. If another table in your server is already recording, record separately with a free tool like Craigbot and bring it in afterward with Audio Upload — no paid software or file conversion needed, and no live bot connection required. Multi-track uploads (one file per player) give you the same accurate speaker mapping as a live session — each file is already tied to a speaker, so no voice profiles are needed. Uploading a single mixed file instead? Archivist uses voice profiles to map speakers, and on first use will walk you through confirming which voice belongs to which character. Running into this often for the same server? Reach out and we'll help set up the lowest-friction flow for your table.
Watch voice session demo:
Play-by-Post Ingestion
- Ensure Discord is connected (see Connect Discord).
- In Archivist: Campaign → + Add Session → Play-by-Post.
- Paste the first and last Discord message URLs (Right-click → Copy Message Link).
- Create Session. Long threads may split into multiple sessions automatically.
- Session Review is triggered; you'll be emailed when ready.
Ask Archivist in Discord
- @archivist: Mention in a configured text channel to ask questions about prior/completed sessions. Answers draw from transcripts, summaries, entities (C/I/L/F), beats, and lore.
- /ask: Registered slash command that points users to the mention-based flow above.
- /asklive: Use during an active recording session to ask questions about the in-progress session. Answers come from the current session transcript.
- /askprivate: Ask about the configured campaign with your private journals included. Replies are ephemeral to you.
- Responses may span multiple messages (>2000 chars).
Keep Session Reviews up to date for best results with @archivist.
Validate & Test
- Auth sanity check:
/test account— confirms your Discord account is linked to Archivist. - Recording test:
/test recording— single-utterance transcription; does not consume a session credit. - Channel test:
/test channel— posts the bot's current channel registration/configuration message. - Load one channel:
/loadchannel— registers the current text channel so it can be assigned in Archivist. - Load all channels:
/loadchannels— bulk registers all text channels in the server.
Command Reference
| Command | Purpose | Notes |
|---|---|---|
/start | Start live voice session + pick campaign | Bot must be invited to the voice/text channels you're using |
/end | End live session and finalize transcript | Triggers Session Review |
/pause / /resume | Temporarily stop / continue recording | Same session; /pause disconnects from voice and /resume reconnects |
/ask | Help prompt for Ask Archivist | Currently tells users to ask via @archivist mentions in configured channels |
@archivist | Ask campaign questions | Prior/completed sessions only; mention in a configured channel (long answers may split) |
/asklive | Ask questions about in-progress session | Use during active recording session; answers from current session transcript |
/askprivate | Ask with private journals included in context | Uses your private journals; replies are ephemeral to you |
/loadchannel | Register the current text channel for Archivist chat setup | Run in the channel you want to configure, then assign its campaign in Archivist |
/loadchannels | Bulk register all text channels in the server | Useful during initial setup for larger servers |
/test account | Verify your Discord account is connected to Archivist | Returns a greeting when account linking is valid |
/test recording | Verify transcription on one utterance | No session credit consumed |
/test channel | Check current channel setup | Posts the registration/configuration state for the current text channel |
Troubleshooting
- Bot didn't join voice: You ran /start, selected a campaign, and invited the bot to that voice channel?
- Bot is already in a session elsewhere in your server: Discord only allows a bot to hold one voice connection per server, so a second live session can't start in the same server until the first ends. Record with a free tool like Craigbot instead — no paid software or file conversion needed — and bring it in with Audio Upload (single file or multi-track, one file per player) once you're done. Multi-track uploads give you the same speaker-mapped result as a live session — no voice profiles needed. Multiple tables sharing a server regularly? Contact us and we'll help find the least-friction setup.
- Permission/auth issues: Reconnect via Profile (avatar in top nav) → Discord. Re-invite the bot to private channels if needed.
- Channel not recognized: Run
/loadchannelin that text channel, or/test channelto inspect its current setup. - "Is it recording?": Run
/test recordingto confirm transcription path. - Low transcription quality: Headphones, less crosstalk, clear speech. If needed, upload higher-quality audio post-session.
- Still stuck? File a support ticket or post in our Discord.